Creating Conversational Flows
Creating Conversational Flows
Article Summary
Share feedback
Thanks for sharing your feedback!
Conversational flows allow you to communicate with your subscribers via text messages and trigger different automation scenarios depending on their answers.
In this article, you'll learn how to create and use conversational flows.
Starting a conversational flow
- In your Yotpo SMS & Email main menu, go to Flows > My Flows.
- Click Create Flow.
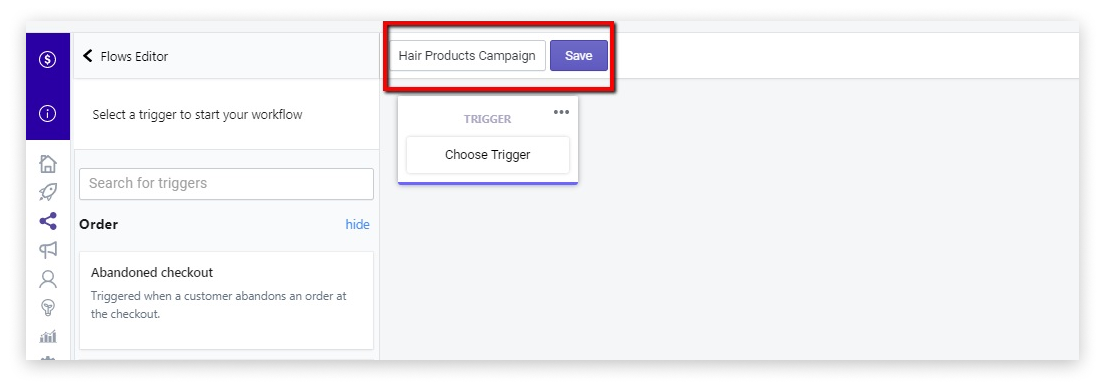
- Give your flow a name, for example: Hair Products Campaign. Don`t forget to click on the Save button.
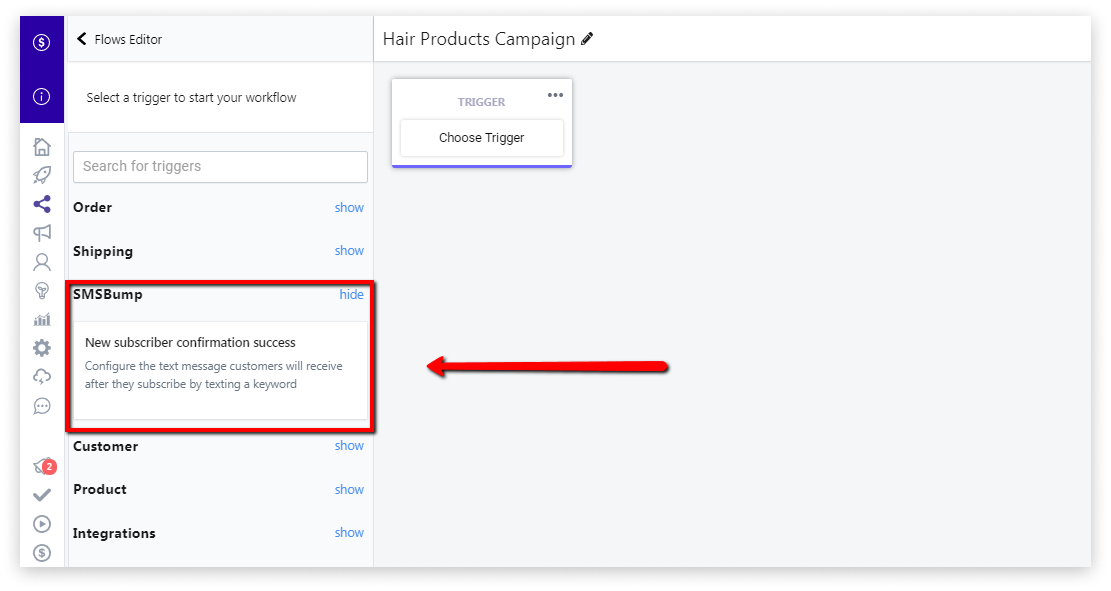
- Select a relevant Trigger. This is the action that will initiate the entire Flow. For the purposes of this article, we'll choose the New subscriber confirmation success trigger. So when a visitor uses a keyword or one of our other tools to subscribe to you, this action will trigger the flow. It is located in the SMSBump category.


SMS/MMS with Response
Your next step is to select Add action and then the SMS/MMS with responses option. This allows us to ask them a question where we can learn more about them - what offers and products they seek, before we send them personalized deals.

This feature allows you to send a text message to your new subscribers, asking them a specific question and providing them with 1, 2 or 3 keywords they can text back as an answer. The point of this question is to find out something about them that will help you send personalized deals.
In our example we will ask our new subscribers what type of hair/scalp do they have. We will define 3 possible answers: DRY, NORMAL and OILY. Here is how it looks in the flow builder:

Now is time to customize the text message that your subscribers will receive first.
Section 1 (top left): Here is where you configure how many keywords you’d like to have as options and their names. As explained above, our keywords will be DRY, NORMAL and OILY. They will automatically appear in the copy of your text message in the section below.
Section 2 (bottom left): Here is where you customize the text of your message.
Start with a simple “Hello, Laura” to give your message a personalized touch. Don’t forget to tell them who’s reaching out by including your store name, using the available short codes. Thank your subscribers for opting in and then ask them to answer your question so they receive a fitting deal. To make it more appealing for them to answer, mention that they will receive a small incentive if they reply with one of the keywords. Don`t forget to put Add STOP to opt out using the second checkbox. If you are like us and accidentally forgot, our Strength meter will remind you. (smile). Use it to get tips on what your text message might be missin
Click on Preview to see what your message will look like.
Now that the copy of our first text message from this flow is ready, we can move on to the next steps.
Segment subscribers depending on their answers
The next step from our flow will be to split your subscribers into separate lists based on their answers. This will help you segment your customers even better, because you will already have your customers in groups depending on their scalp type (in our example). Keep in mind that it is not mandatory to include this step in your overall flow.
To do this, click on Add step, select Add action and choose Add to list. Do this of each of the branches.

If you’ve already created separate lists for the different types of customers, choose the respective list according to each branch. If not, create a new list.

So here we assign each of the three branches “DRY”, “NORMAL” and “OILY” to our lists with corresponding names. This is how when a subscriber answers your question that they have a DRY scalp, he or she goes directly to your DRY list.
So now once you have more context about the customer, you can send them personalized offers.
Set up promotional messages for segmented subscribers
So what do we want to achieve with our next step?
We want to send a specific targeted message and promote products for DRY hair to customers who have DRY hair.
To set this up, add another step to the flow – Add Action, and select to send either an SMS or MMS message. In our case - this is an MMS message.

Now we need to create another copy – this time for the second text message your subscribers will receive. And remember – this time our goal is to SELL.
Step 1: Choose an image for the MMS. Ideally, here you would put a photo of your products for DRY hair or an image of a woman with focus on her hair. Click on the Pick an image button in the middle.

Then select from the 4 available options:
- GIPHY: a library of gifs.
- GIPHY stickers: a library of stickers.
- PEXELS: free stock image library.
- Upload an image: use this option to upload images from your computer.

Step 2: In the box you see a predefined copy from our Flow Builder. Feel free to change it to fit your brand voice better. Remember how in the first message we promised a discount and then asked a question? Well, now we have to continue the conversation with the (dry-hair) subscriber with this text, for example, which you can copy and paste in the Text message box:
What your hair needs is some extra nourishment, natural oils treatment and special formula to fight dehydration! Here's your 10% discount code on all of our products - especially designed for DRY hair:

If you want to include a little incentive, click on the first checkbox “Add Discount”.
Pro Tip:
We always recommend you use the “Unique code per client” option. This will ensure more accurate targeting and will help you keep track of each individual campaign.
Do you want to embed the discount code in a link? Yes, we do. Leave the check box ticked. If you want to redirect subscribers to your home page, you should leave this field empty. In our example, there is no point to lead them to the homepage, since we just found out they need products for DRY hair. So here we want to put a link to our DRY hair product page!
So we have:
- Added an image
- Created the copy
- Added a discount code
- Added the obligatory Add STOP to opt out
Our Strength Meter marked our message as Strong. The only suggestion is to add the brand name in the beginning, but since we did that in our first message of the flow – it is not needed here.
Once again, you can preview your text message by clicking the Preview button in the top right of the Text message field.
Final steps
- Don`t forget to finish all branches of your flow! In our example we finished the Flow for all customers with DRY hair, but you still have to add all necessary steps to the NORMAL and OILY branches.
- Don`t forget to regularly hit the Save button while customising your flows.
- If you put a step that you want to remove, just click on the top right corner of the box and select Delete. Then you can choose from two options: Remove connected steps/Remove only this step.
- For more useful tips and tricks when working with flows check out our detailed tutorial here.
So this was our detailed tutorial on how to set up conversational flows.
They will be extremely useful to your business and your online store, because they allow you to set up different types of automations, create advanced flows based on the preferences of your customers and overall take the segmentation process to the next level!
As always, if you have any questions regarding the features of your conversational flows or are not sure how to set up properly, don't hesitate to contact our support team at support@smsbump.com or via Facebook Messenger!
Was this article helpful?