Creating an Embedded Form
Creating an Embedded Form
Article Summary
Share feedback
Thanks for sharing your feedback!
With the help of embedded forms, you can collect subscribers in a quick and seamless manner.
Use our advanced builder to set up and customize the form. Copy the code and paste it into your website theme files to display on any page you like.
For best results, you can combine it with a small incentive to attract new subscribers and boost engagement.
In this tutorial, you will learn how to create a subscription embedded form.
Getting started
To create an embedded form:
- In your Yotpo SMS & Email main menu, go to Audience > Subscriber Collection Tools.
- Click the Embedded Form card. If you don't see it, click Show tools to expand the view.
You will now be able to see the main dashboard with 2 menus.

The menu on your left side is your editor. This is where you will determine the design of your subscription form.
The menu on the top of the page allows you to change the name of your new form and decide on its status: whether you want to publish it or keep it as a draft.
If you click the Exit button in the top right corner, you will leave the embedded form menu and will go back to the main Subscriber Collection Tools Dashboard.
Customize design
We will now walk you through the design menu. It is located in the top left corner of the dashboard and is full of exciting features to design the perfect embedded form!
The design menu will help you customize the layout of the form, the fields it contains, and regulation requirements. You can review how your form will look like on a desktop device, on a tablet, or on a mobile phone at all times, by switching between the 3 options in the top left corner.
Our embedded form comes in 2 steps. It means you get to customize the whole customer experience - the form on your website and the thank you message for your new subscribers. That is why in the bottom left corner you can see a big blue Next form button, showing you the total number of steps you need to follow in order to complete the customization of your form.
You can also switch between steps from the buttons at the top of the page: Form 1 and Success.
Right next to them are another 3 useful buttons:
Undo - reverses your last action.
Redo - brings back your last action.
Disable element - allows you to quickly disable a certain design element from the embedded form. You only need to click on the particular element and then select Disable.
Layout
This is the place where you get to choose the overall design and feel of your form.
Form
Time to customize the main elements of your embedded form: background color, shape, blocks, and the CTA button.

You have the option to change the background color of your form from a built-in color palette.
The Rounded Corners section allows you to determine how round you want the corners of your form to be. If you change the number to 0, it will be in а rectangular shape.
You can play around with the Form Type and the Button Style and choose which design suits you best - whether the main parts will be in blocks or inline. If you decide to leave the Form Type Inline, you can select if you want the Subscribe button below to be in the left, middle, or right part of the form.

Text
This is where you fill in and customize the texts of your subscription form.
The header text is the top text box. In this example: “Be a VIP. Join our text marketing newsletter.”
The description text is just below your Header text. In this example: “Be in the know. Get the latest tips and tricks for the fashion industry first.”

You can switch between the two texts from the drop-down menu above. If you want to remove either of them, you can do it by disabling the field - available in the top section of the menu.
Our detailed text menu allows for full text customization:
Align Text - left, right, or centered.
Text Options - bold, italic, or underlined.
Choose Font - we have a large variety of available fonts.
Font Size - choose the size of the letters.
Line Height - choose the height of the text boxes.
Text Color - choose from a palette of colors.
Add Custom Font - you can import font of your choice. Just remember that not all fonts are free to use. You need to check the font’s license to make sure commercial use is permitted.
Fields
This is where you get to customize the Fill-in blocks of your subscription form: Country Field, Phone Field, Email Field, Button Field.

It is up to you to choose which of these fields you want to be enabled, which should be disabled, and which will be mandatory for your subscribers to fill out.
Yotpo SMS & Email users have the option to collect emails as an addition to phone numbers. However, the email-only subscription option is only available for those of you, who have enabled the SMS & Email - Klaviyo integration. If you choose to disable the integration, the phone number collection will become once again mandatory.
You can customize the color of each field, the color of the texts, and the size of fonts. You can also enable borders and choose their size, style, or color.
After you customize each of the fields (Country, Phone, Email, Button), we can now move on to the next section: Regulations.
Regulations
This is where you get to customize the final parts of your subscription form - all related to the TCPA & CTIA compliance regulations.
Checkbox
This menu gives you the option to add a checkbox to your form with links to your Privacy Policy and Terms of Service. If visitors check the box, they agree to these policies and terms. 
This part is optional - you can have it enabled or disabled. You can also choose to make it mandatory. From the palette below you are able to choose the color for the checkbox text.
Compliance
This is where you get to customize the obligatory compliance text in your form - to make sure your customers give their explicit consent to receive text marketing messages from you. The copy of the text is pre-set - to make sure it meets all legal requirements.
You can choose the font, font size, line height, and text color. This is where you also add the links, leading to your Privacy Policy and Terms of Service pages.

And last, but not least…
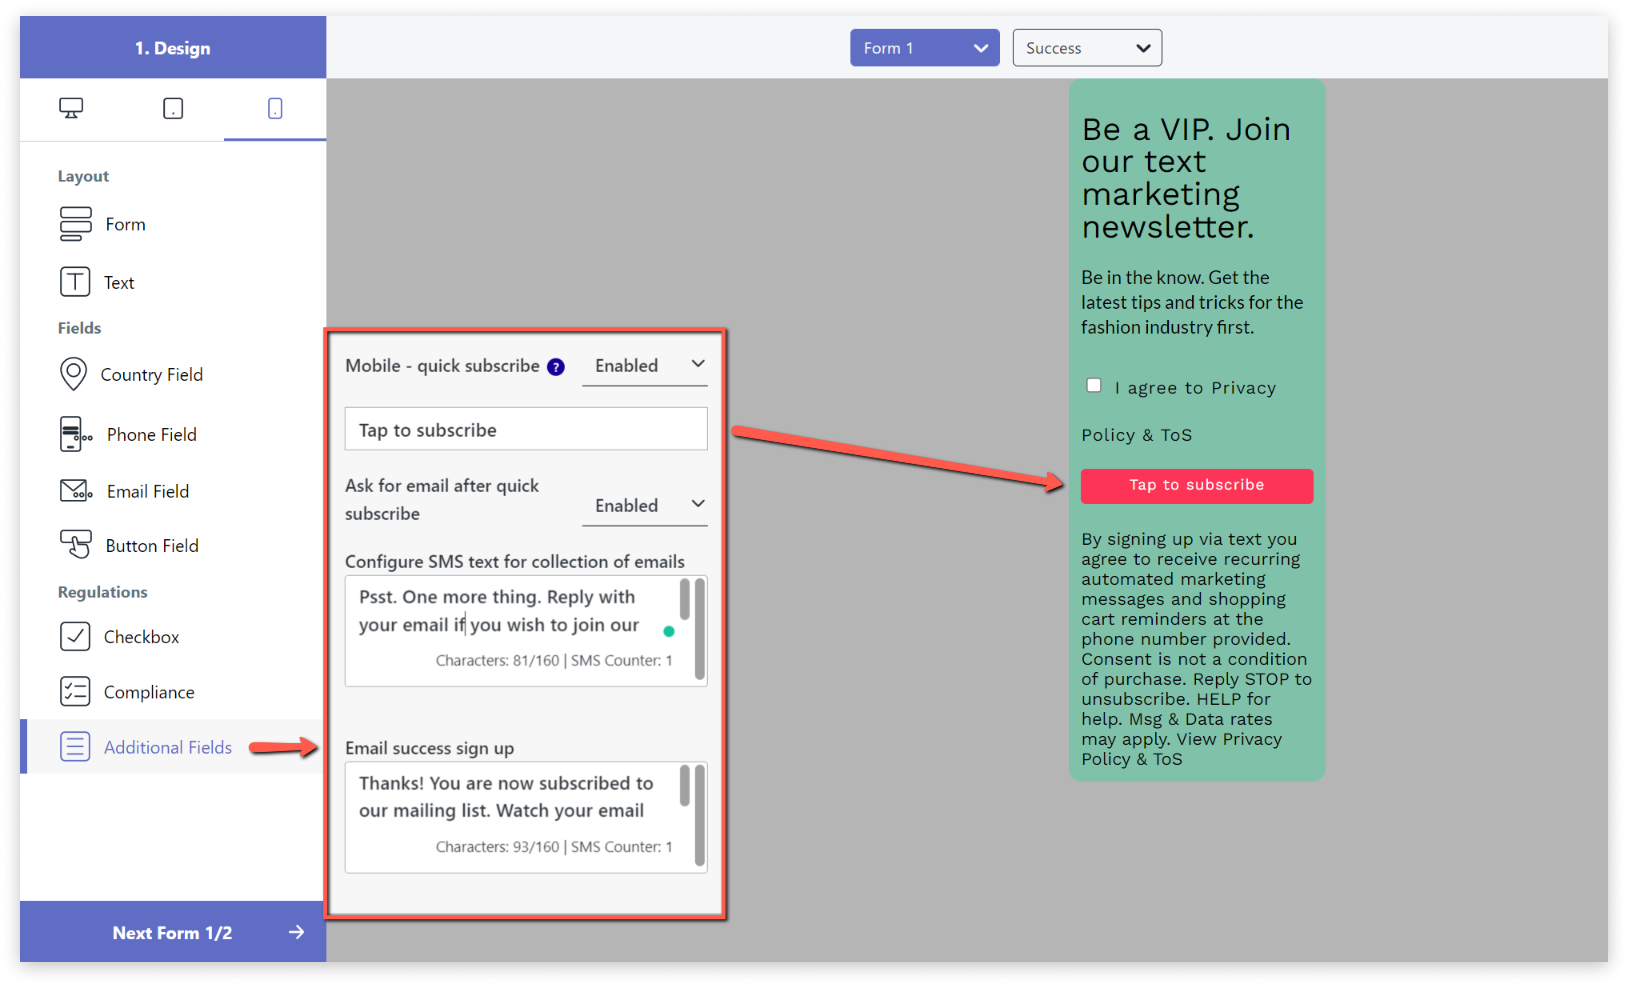
Additional fields
This is where we added 2 more options for you:
- Mobile-quick subscribe: allow customers using mobile phones to subscribe with a single tap. This option is available for the US, Canada, the UK, Australia, France, and Spain only.
- Ask for an email after the quick subscribe. If you enable the mobile quick subscribe, you can, later on, suggest your subscribers join your mailing list as well

If there is still something you would like to change when it comes to the design of your form, you can add a custom CSS by clicking on the Form button at the top of the page and then choosing Add Custom CSS.

A popup will appear. Paste the CSS code (as shown below) and then click on the Save button.

Success message
Now that you have finished customizing the design of your Form 1, it is time to move on to the second step - the Success Message. You can open it either by clicking on the success button on the top or by clicking the Next form 1/2 blue button in the bottom left corner.

The Success Message is what visitors will see right after they have subscribed to your text marketing club. Use it to thank them for becoming a part of the family and tell them what they should expect from you in the future.

This time the customization options are significantly less compared to the previous form: you can change the background color and edit the copy of the Header or the Description texts.
Publish
Once you are done customizing the design and the behavior of your form, it is time to publish it on your website. In order for this to happen, simply click on the Publish button in the top right corner.
You will then see the following message:

This option allows you to decide whether you want to have a Flow associated with this specific embedded form.
After you make your choice, the following window will appear:

Our system generated a snippet and added it to the theme files of your Shopify store. You can now place the embedded form wherever you want it to appear on your website. Just copy the code by clicking the blue Copy to Clipboard button and paste it into the body tag of your desired theme file.
You will find your theme files by going to your Shopify dashboard → Themes → Edit code.

Under Layout select theme.liquid.

Paste the copied code in a place of your choice within the body tag of the HTML code, meaning between <body and /body.

Your content goes hereYou don't have to worry about "breaking" your store. As long as the code of the embedded form is placed in the body tag, Shopify has a way of adjusting the HTML code so the form will display properly and will take 100% width of the parent container.
When you are done, don't forget to click the Save button in the top right corner.
Your final task is to set up the SMS your new subscribers will receive after giving their consent to receive text messages from you.

By clicking on the Edit SMS you will be taken to the Automations/Flows menu (depending on your your previous choice) where you can start drafting your text message. This is also the time to set up a special discount if you have promised one in the form.
Track performance
Within the Subscriber Collection Tools menu, you can also track the progress of your forms with metrics such as Impressions, Click-Through Rate, ROI, and more.
From the menu on the right you can edit the form, check out more detailed analytics regarding its performance, and edit the SMS your new subscribers will receive once they opt in for your text marketing services. 
Was this article helpful?